


If you have ever thought of making a cross-platform GUI application, it can seem a bit overwhelming. You might even ask yourself "Where do I even start?, Which technology should I learn?". If you are a developer for who memory management and performance matter the most, you are at the right place. In this article, we will be creating two input fields and show the output message once the button is clicked.
But before we get started we will try to understand the main reason to use Tauri, its advantages, and comparison with already existing technologies.
What is Tauri?
Tauri is a framework for building alacritous fast applications for all major desktop platforms. It gives the developer feasibility to integrate any framework that compiles to HTML, CSS, and JS for building the UI. The backend API on the other hand is a rust-based binary that the front end can interact with.
Why Tauri?
A few years ago, electron transformed how to make desktop applications with the introduction of a framework that works with pure web development knowledge. In this path Tauri, a relatively new framework allows you to quickly create cross-platform applications leveraging the pros of Web Technology as well as the performance of Rust.
Significant benefits of the Tauri framework include:
Better Performance: Tauri apps perform better than electron apps in terms of speed, bundling size, and memory usage. To give a little intuition a "hello world" application can bundle to a size of 60MB in electron which is just 3-4 MB in the case of Tauri applications.
Security: Tauri apps are generally more secure, as it leverages Rust for backend coding, the language designed to make secure and fast applications.
Webview approach: Unlike electron, which uses a chromium engine to achieve a cross-platform badge, Tauri uses the underlying webview library of the operating system that isn't included in the binary, but is linked dynamically at runtime, which greatly reduces the size and improves the performance of the application.
Installing Dependencies
Before getting started we need some pre-requisite to be fulfilled for developing Tauri applications.
Windows Setup
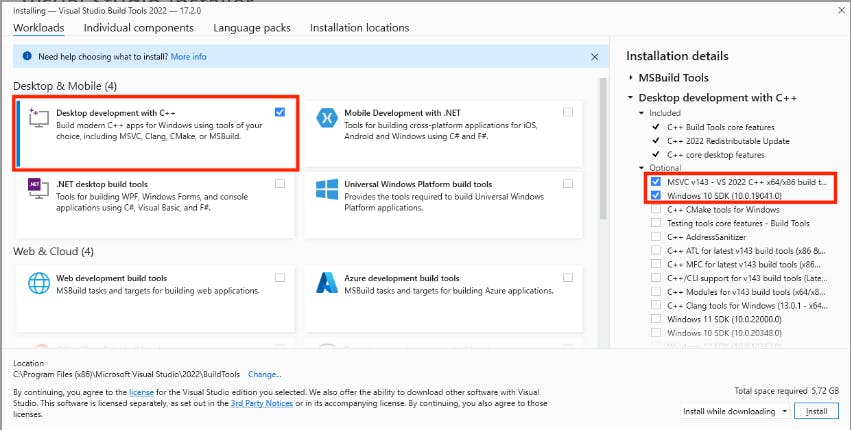
We will need to install Microsoft Visual Studio C++ build tools for the Windows system, which can be easily done by installing build tools for Visual Studio.
Next, we need to set up rust in our system which can be downloaded from Rust's official website.
Linux Setup
For Linux, we will need a couple of system as well as compiler dependencies. This can be achieved by executing the following command.
sudo apt update
sudo apt install libwebkit2gtk-4.0-dev build-essential curl wget libssl-dev libgtk-3-dev libayatana-appindicator3-dev librsvg2-dev
Rust can also be installed with just a one-liner command:
curl --proto '=https' --tlsv1.2 https://sh.rustup.rs -sSf | sh
macOS setup
macOS has the easiest setup among all other platforms. To set up the whole dev environment run the following pair of commands:
xcode-select --install
curl --proto '=https' --tlsv1.2 https://sh.rustup.rs -sSf | sh
Let's Get Started!
“Before software can be reusable it first has to be usable.” – Ralph Johnson
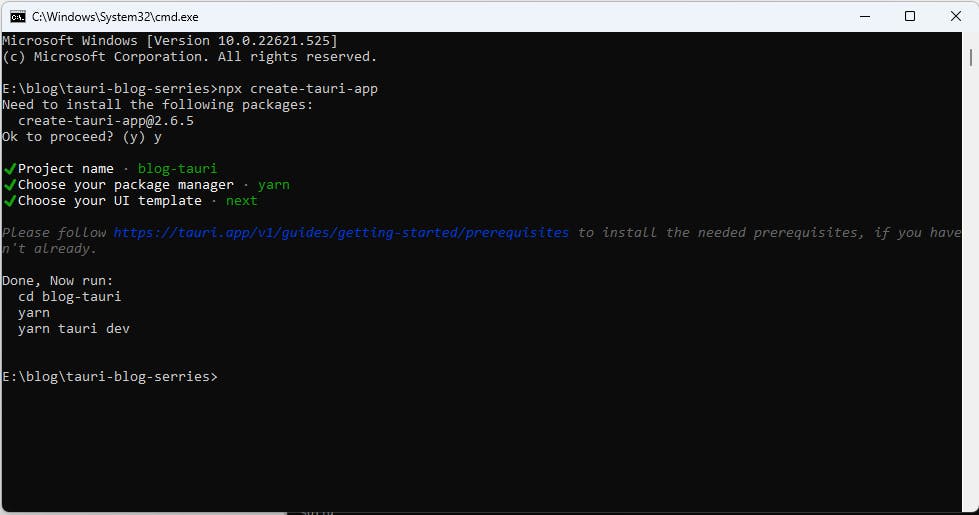
In this series we will use Next.js, a react framework to code the front-end part. Now, create an empty directory and run the following command:
npx create-tauri-app
It will ask a couple of questions before initiating the directory structure. I choose "blog-tauri" as the project name "yarn" as the package manager and "next" as the UI template. You are free to choose any package manager and UI template of your choice.
In the project directory, you can see two folders src and src-tauri which contains our front-end and back-end logic respectively. The index.js under src/pages contains the main front-end logic. The below code contains component with two input fields and one button. To talk to our back-end server we will use invoke function offered by Tauri to pass our parameters to the function and wait for desired output to be returned by the rust code.
import { useState } from "react";
import { invoke } from "@tauri-apps/api/tauri";

function App() {
  const [greetMsg, setGreetMsg] = useState("");
  const [first, setFirst] = useState("");
  const [last, setLast] = useState("");

  async function greet() {
    setGreetMsg(await invoke("greet", { first, last }));
  }

  return (
    <div className="container">
      <h1>What is your name ?</h1>

      <input id="firstname" value={first} onChange={e => setFirst(e.target.value)}/>
      <input id="lastname" value={last} onChange={e => setLast(e.target.value)}/>

      <button onClick={()=>greet()}>Greet Me!</button>
      <h2>{greetMsg}</h2>
    </div>
  );
}

export default App;
Now, inside src-tauri/src/main.rs change the greet function as follows to accept two input parameters and return a greeting string as output.
#![cfg_attr(
    all(not(debug_assertions), target_os = "windows"),
    windows_subsystem = "windows"
)]

#[tauri::command]
fn greet(first: &str, last: &str) -> String {
    format!("Welcome! {} {}", first, last)
}

fn main() {
    tauri::Builder::default()
        .invoke_handler(tauri::generate_handler![greet])
        .run(tauri::generate_context!())
        .expect("error while running tauri application");
}
To run the app hit yarn run tauri dev in the terminal window. This will lead to a series of steps:
Compilation of Next.js code
Fetch required files for webview
Download required crates for Tauri (ps: Crates are just like packages in javascript).
Compilation of crates and building of webview
After all these processes we can finally see a webview that renders GUI with the help of webview-2.
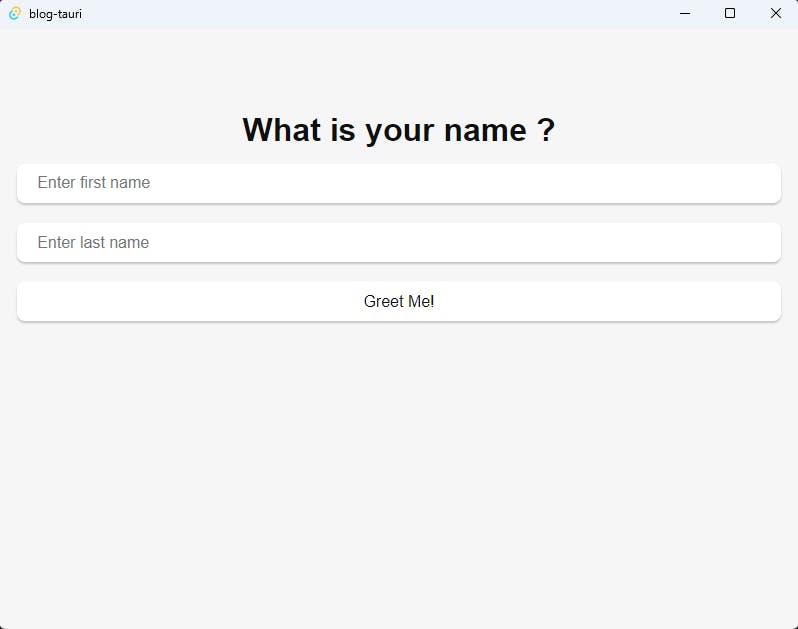
To check GUI's interaction with the backend, let's enter the text fields and check the action.

This is quite simple! Just add your rust and React knowledge to main.rs and index.js respectively and leave the rest of the heavy lifting to Tauri. I hope you now understand the basics of Tauri to kickstart. What are you waiting for? Fire that terminal up, install create-tauri-app, and start building your awesome ideas!